ANSYS Workbench with Excel and Python
If you are looking to drive ANSYS Workbench with Excel and Python, you may have come across the post by PADT here: http://www.padtinc.com/blog/the-focus/workbench-and-excel-part-2-driving-workbench-from-excel-with-python. This was a really useful introduction, but I had some issues with getting the examples to work.
Scripting ANSYS Workbench with Excel and Python
I didn’t have much luck getting the PADT examples to work without some modification, so if you’ve had the same issue then see below for the working files. The content consists of an ANSYS Workbench project (included in the Archived format below, so be sure to File>Restore Archive… to extract the project), an Excel sheet to run the analysis and extract the results, and a Python script to handle the interaction of Excel and ANSYS.
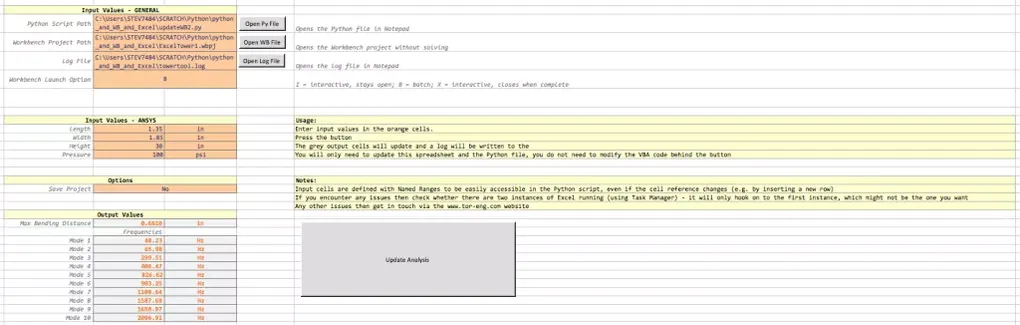
One of the improvements I made was to update the Excel sheet so that there should be no need to modify the VBA code – all the options can be configured via the orange input boxes, including running the analysis in Batch Mode for quicker and background solving.
The Workbench project includes the analysis and parameter variables that we want to vary. This will obviously depend on your own model and requirements. It also has the output parameters that we will read in to Excel once the analysis has completed.
The Python script is the interface between Excel and ANSYS and will need to be modified to suit your model, but it should be relatively self-explanatory. Essentially the Workbench input parameters are given values from the Excel sheet, then the analysis is solved, then the Workbench output parameters are given back to Excel.
The Excel sheet looks like this:
Files for Scripting ANSYS Workbench with Excel and Python
- Excel Workbook: TowerTool1.xlsm TowerTool1
- ANSYS Workbench Project: ExcelTower1.wbpz ExcelTower1.wbpz
- Python Script: updateWB2.py updateWB2
I hope these work for you, but if you have any issues or questions then get in touch.